Day6-DevOps
Shell Scripting Advanced | Advanced Shell Scripting

Hunt For Cloud DevOps Role | Cloud Engineer having 2 years of Experience through Practical | Passionate DevOps enthusiast.
Shell Scripting Advanced :
Backup
Crontab
Functions
ACL(Access Control List)
What is Backup?
Backup means we have to create a copy of files/directories/projects of every day or time-interval/time stamp or monthly or yearly in minimal space which might be used for future purposes to recover files/directories/projects if any mishappen.
Backing up involves making regular copies of files, directories, or projects on a daily, periodic, or scheduled basis, storing them efficiently to save space. These backups serve as a safeguard, enabling the recovery of files, directories, or projects in case of any unforeseen events or mishaps in the future.
How we can store folders efficiently?
- We can compress or Zip the Folders/Files.
We can do backup in two different ways :
Daywise / Monthwise / YearlyWise (As per requirements)
Timestamp
Let's see Some Scenario :
If you provided space :
  src_dir = /home/ubuntu/7DaysScript
  tgt_dir = /home/ubuntu/backup

  current_timestamp = $(date "+%Y-%m-%d-%H-%M-%S")
  echo $current_timestamp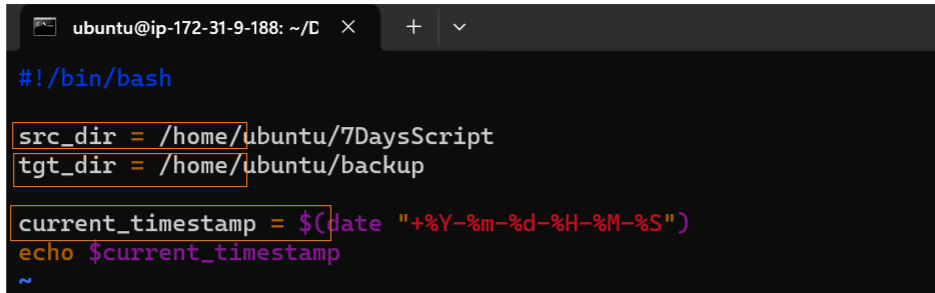
then output is :
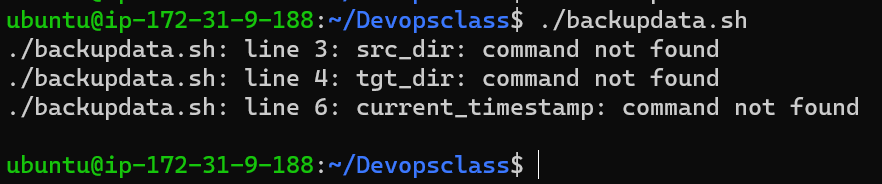
If You script like this :
  src_dir= /home/ubuntu/7DaysScript
  tgt_dir= /home/ubuntu/backup

  current_timestamp= $(date "+%Y-%m-%d-%H-%M-%S")
  echo $current_timestamp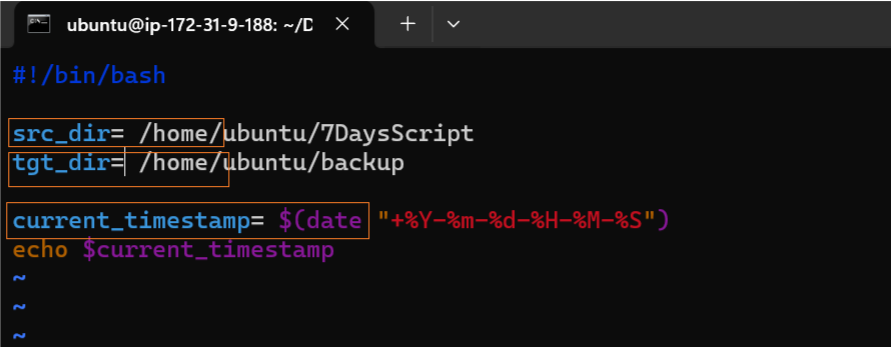
Output :

If No spaces :
  src_dir=/home/ubuntu/7DaysScript
  tgt_dir=/home/ubuntu/backup

  current_timestamp=$(date "+%Y-%m-%d-%H-%M-%S")
  echo $current_timestamp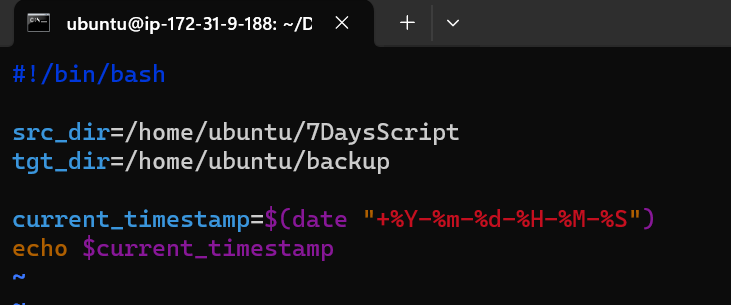
Output :

Here we learned how to write Timestamp:
  src_dir=/home/ubuntu/7DaysScript
  tgt_dir=/home/ubuntu/backup

  current_timestamp=$(date "+%Y-%m-%d-%H-%M-%S")
  echo $current_timestamp
  echo $(date)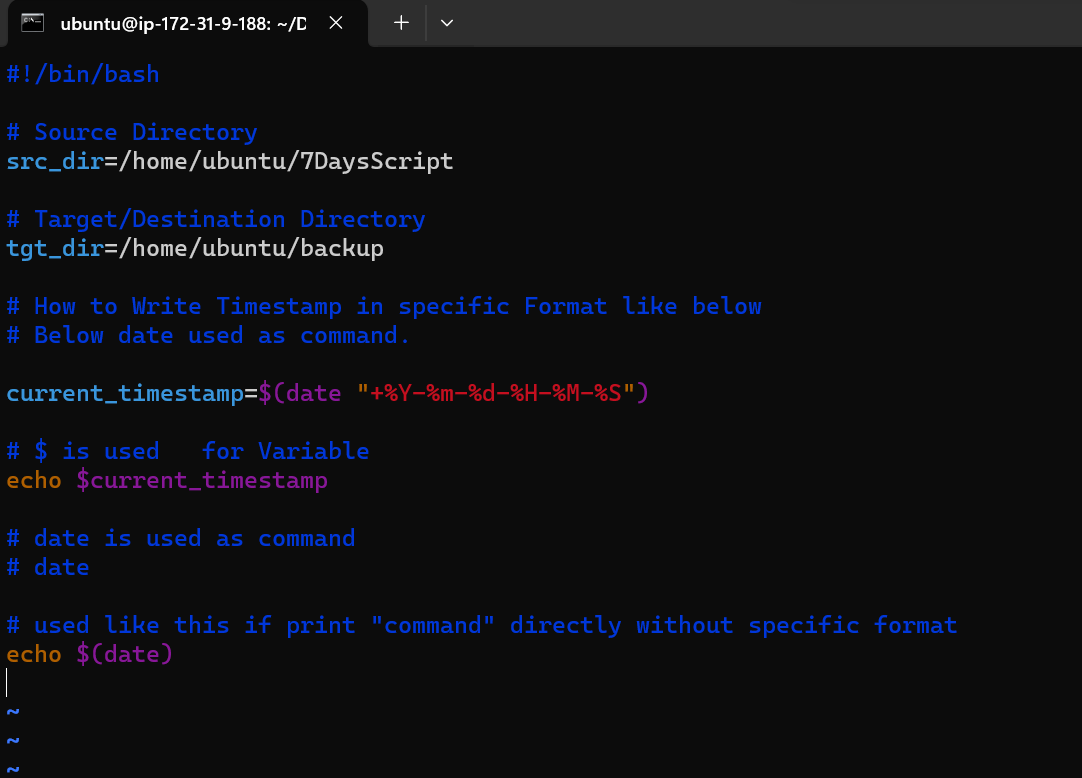
Output :

Archiving Files in Linux:
Archiving files in Linux involves creating a compressed or uncompressed archive of one or more files or directories. Archiving is useful for bundling files, creating backups, and reducing storage space.
What is Tar?
In Linux and other Unix-like operating systems, tar stands for Tape ARchiver 📼. It is a versatile command-line tool used for creating, extracting, and managing archive files. Archive files, also known as tarballs, are single files that contain multiple files and directories, making them convenient for data storage, distribution, and backup purposes 🗃️.
The "tar" command helps you put lots of files and folders together into one big file 📦. However, it doesn't shrink the file by itself. You can use it with other tools like gzip or bzip2 to make the big file smaller 🔄. Think of it as a double act: first, it packs everything neatly into a bundle using TAR, and then it squeezes that bundle to save space using GZIP 🌪️.
tar <options> <file>
.tgz - high compression :
Here's a summary of the most common options: 📃
Creation Options: 🚀
-c: Creates a new archive file. ➕ 📁-z: Compresses the archive using gzip. 🗜️ 💨-f: Specifies the filename of the archive file. 📁 🏷️-v: Displays verbose output, providing detailed information about the operation. ℹ️ 💬
Extraction Options: 📦 🔓
-x: Extracts the contents of the archive file. 📤 📂-z: Decompress the archive before extracting its contents (if applicable). 🗜️ 💨-f: Specifies the filename of the archive file to extract. 📁 🏷️-C: Extracts the contents to the specified directory. 📁 📌-v: Displays verbose output during extraction. ℹ️ 💬
Additional Options: ✨
-t: Lists the contents of the archive file without extracting them. 📃 🔎-A: Appends files to an existing archive file. 📁 ➕-j: Compresses the archive using bzip2 instead of gzip (optional). 🗜️ 🔋-r: Replaces or updates existing files in the archive. 🔁 📑-W: Verifies the integrity of the archive file. 🛡️ ☑️-P: Preserves file permissions, ownership, and timestamps. 🔒 📁
What is Zip?
In Linux, zip is a command-line utility used for compressing files and creating archives. It helps you bundle one or more files or directories into a single compressed file, known as a ZIP archive. This compressed archive makes it easier to store, share, and transfer multiple files, saving disk space and facilitating efficient data management. In simple terms, the zip command allows you to put files together, squeeze them into a smaller package, and make them easier to handle. It's a handy tool for creating compressed archives in Linux and other Unix-like operating systems.
.zip - less heavy compression
Creation Options:
-0: Outputs the zip archive to standard output. 📤23-e: Encrypts the zip archive with a password. 🔒-l <file>: Creates a zip archive from a list of files. 📃-T <file>: Excludes files and directories listed in a file. 🚫-z: Uses ZIP64 format for files larger than 4GB. 📈
Common Options:
-c: Creates a new zip archive. ➕-f <file>: Specifies the name of the zip archive file. 📁-n <number>: Sets the compression level (0-9). 🗜️-r: Recursively zips all files and directories within the specified directory. ♻️-t: Tests the integrity of a zip archive. 🔍-v: Verbose output, showing detailed information during operation. 💬-P: Sets the password for encrypted archives. 🔑-u: Updates existing files in the archive with newer versions. 🔄-x: Excludes specific files or directories from the archive. 🚫-z: Compresses files within the archive using various compression methods (store, deflate, bzip2, lzma). 🗜️
Additional Options:
-A: Adds Unicode support for filenames. 🌐-j: Sets the compression level for the archive (0-9). 🎚️-m: Creates a multi-part zip archive (useful for large files). 📁-o <file>: Specifies the output directory for extracted files. 📁-q: Quiet mode, suppresses non-error output. 🤫
Comparison of .zip and .tgz:
| Feature | zip | tgz |
| File format | Proprietary | Tar + Gzip (compressed TAR) |
| Compression algorithm | DEFLATE | Gzip |
| Default compression level | Lower | Higher |
| Encryption | Supported | Supported |
| Archiving multiple files | Yes | Yes |
| Archiving directories | Yes | Yes |
| Portability | Portable across platforms | Portable across platforms |
| Ease of use | Simpler syntax | More complex syntax |
| Common use cases | Compressing and archiving files for general use | Compressing and archiving files on Unix-based systems |
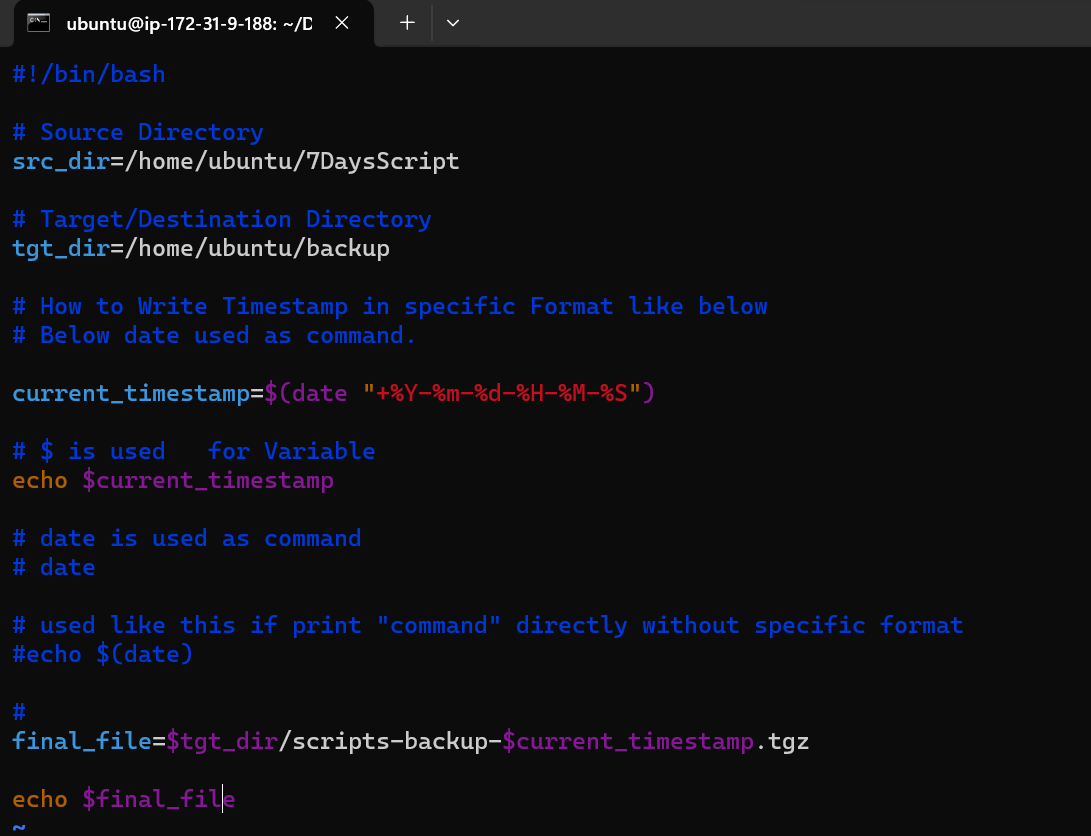
src_dir=/home/ubuntu/7DaysScript
tgt_dir=/home/ubuntu/backup

current_timestamp=$(date "+%Y-%m-%d-%H-%M-%S")
echo $current_timestamp
final_file=$tgt_dir/scripts-backup-$current_timestamp.tgz
echo $final_file

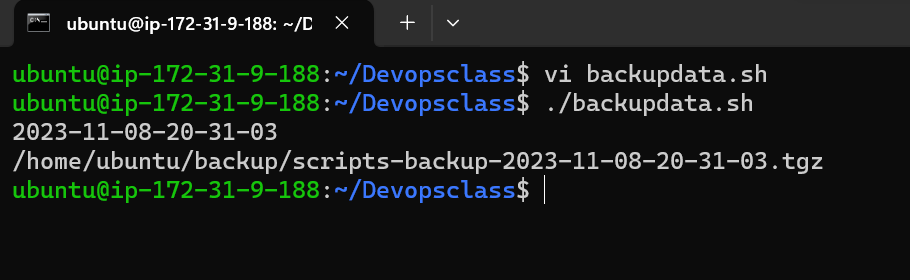
#Vi backupdata.sh
#./backupdata.sh
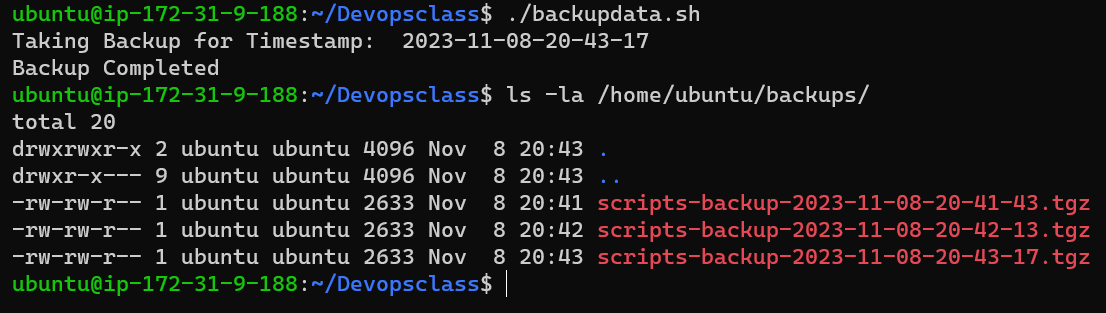
src_dir=/home/ubuntu/7DaysScript
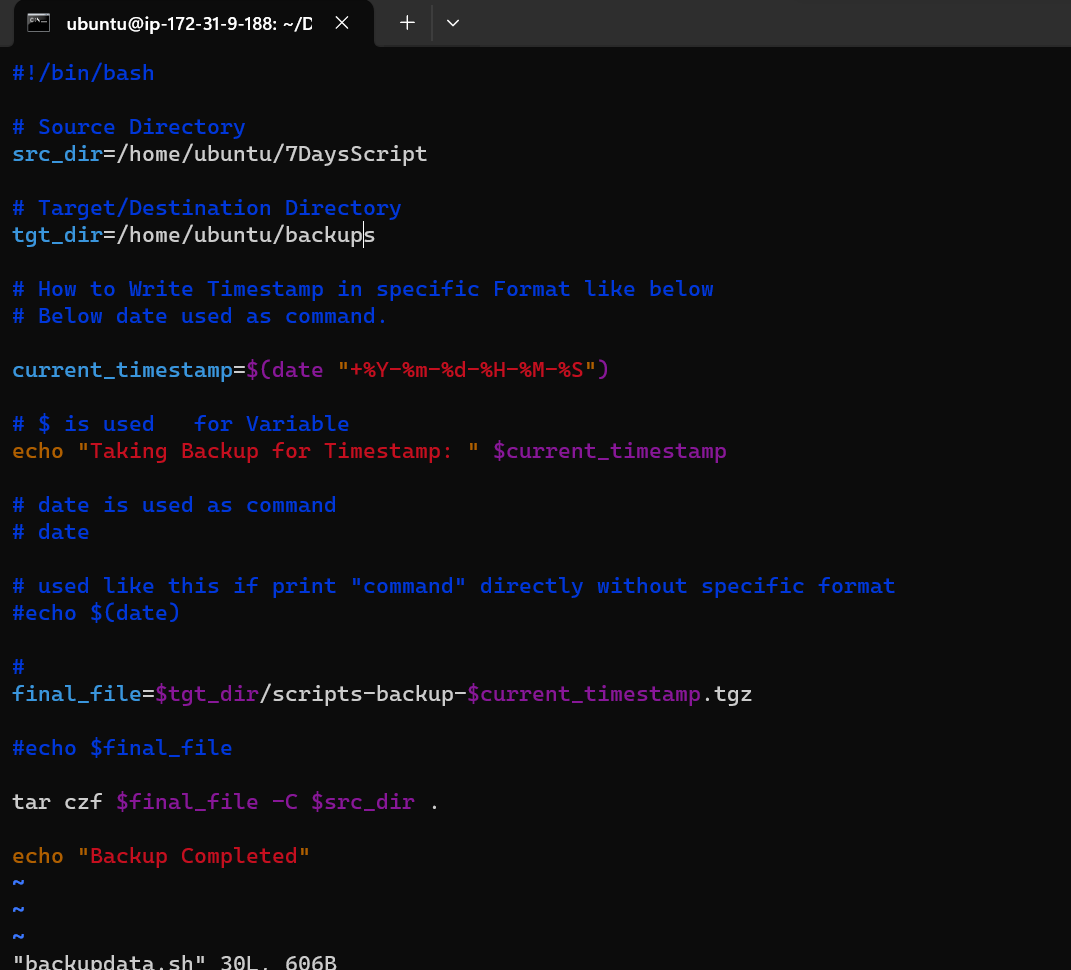
tgt_dir=/home/ubuntu/backup

current_timestamp=$(date "+%Y-%m-%d-%H-%M-%S")
echo $current_timestamp
final_file=$tgt_dir/scripts-backup-$current_timestamp.tgz
echo $final_file

#Vi backupdata.sh
#./backupdata.sh
tar czf $final_file -C $src_dir

echo "Backup Completed"
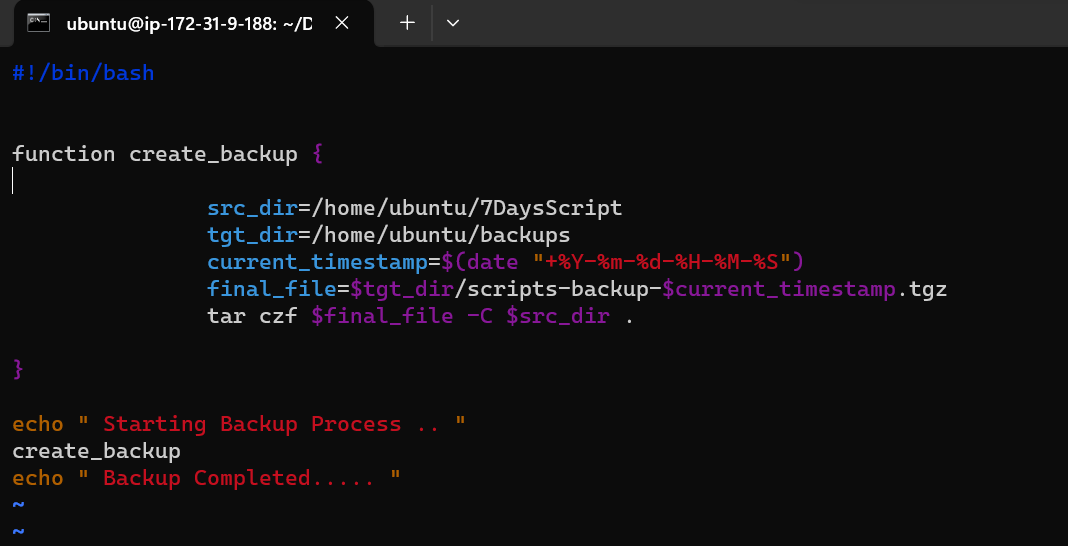
Function Creation :
#!bin/bash

function create_backup {
                  src_dir=/home/ubuntu/7DayScript
                  tgt_dir=/home/ubuntu/backups
                  current_timestamp=$(date "+%Y-%m-%d-%H-%M-%S")
                  final_file=$tgt_dir/scripts-backup-$current_timestamp.tgz

}

echo "Starting Backup Process .. "
create_backup
echo " Backup Completed....."
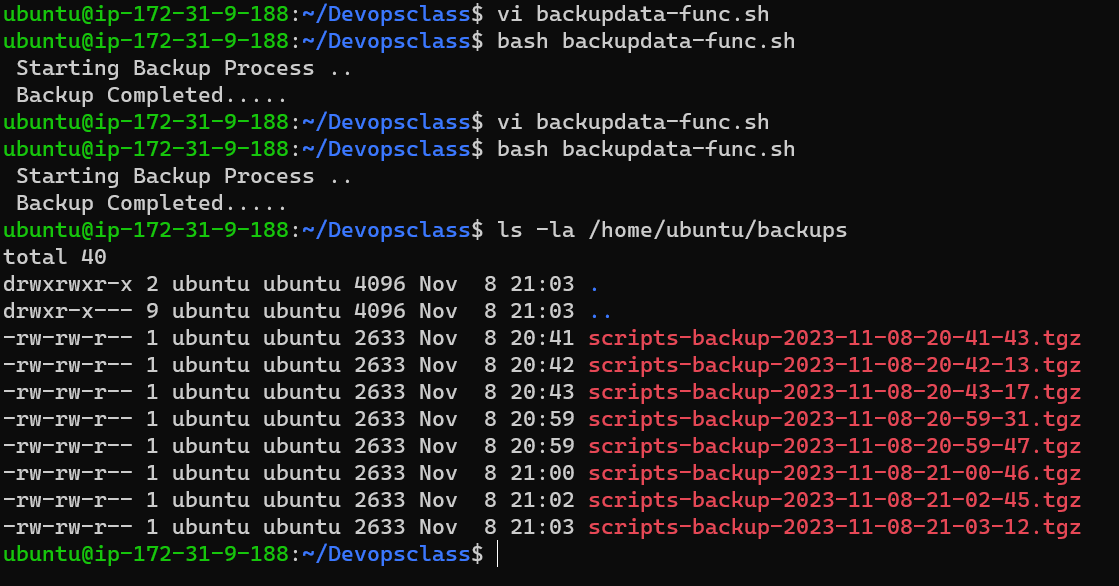
vi backupdata-func.sh
bash backupdata-func.sh

ls -la /home/ubuntu/backups
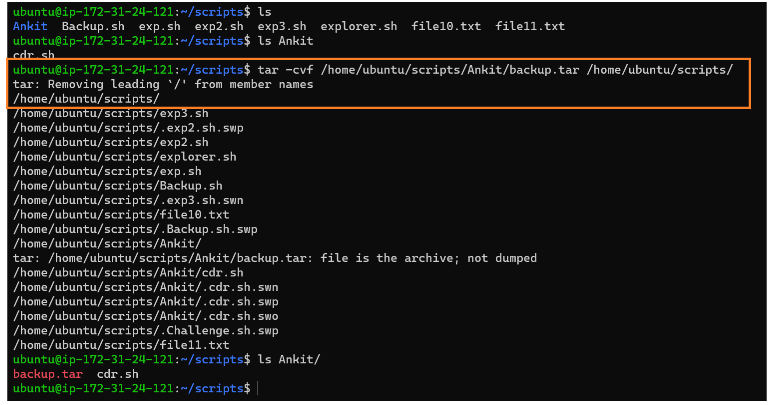
To create a tar archive file :
tar -cvf /mnt/backup.tar /var

/mnt/backup.tar: This is the path and name of the archive file
                 that will be created. In this case, the archive file
                 is named "backup.tar" and is located in the "/mnt" directory.

/var: This is the directory or list of files and directories that
      you want to include in the archive. In this case, it's the "/var" directory.
      The tar command will recursively archive the contents of the "/var" directory
      and include them in the "backup.tar" archive file.
To show file size in human-readable format:
du -sh /var
du -sh /mnt/backup.tar

To extract a tar file on the default location(the current working directory):
sudo tar -xvf /mnt/New.tar

sudo tar -xvf New.tar

# -x - Extract files from an archive.
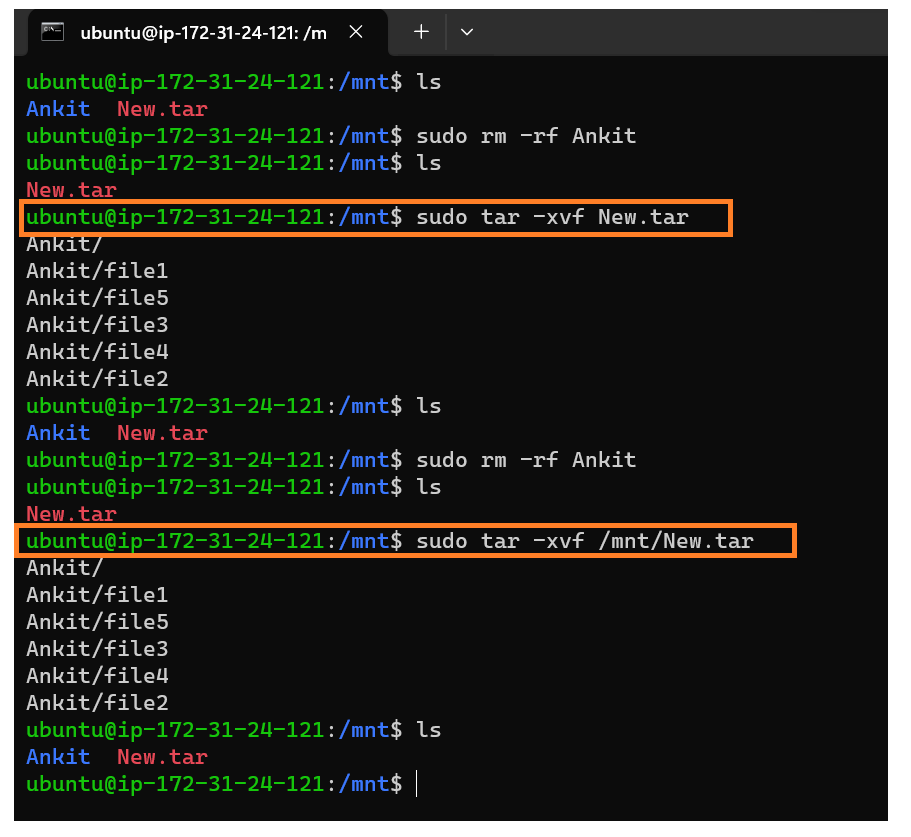
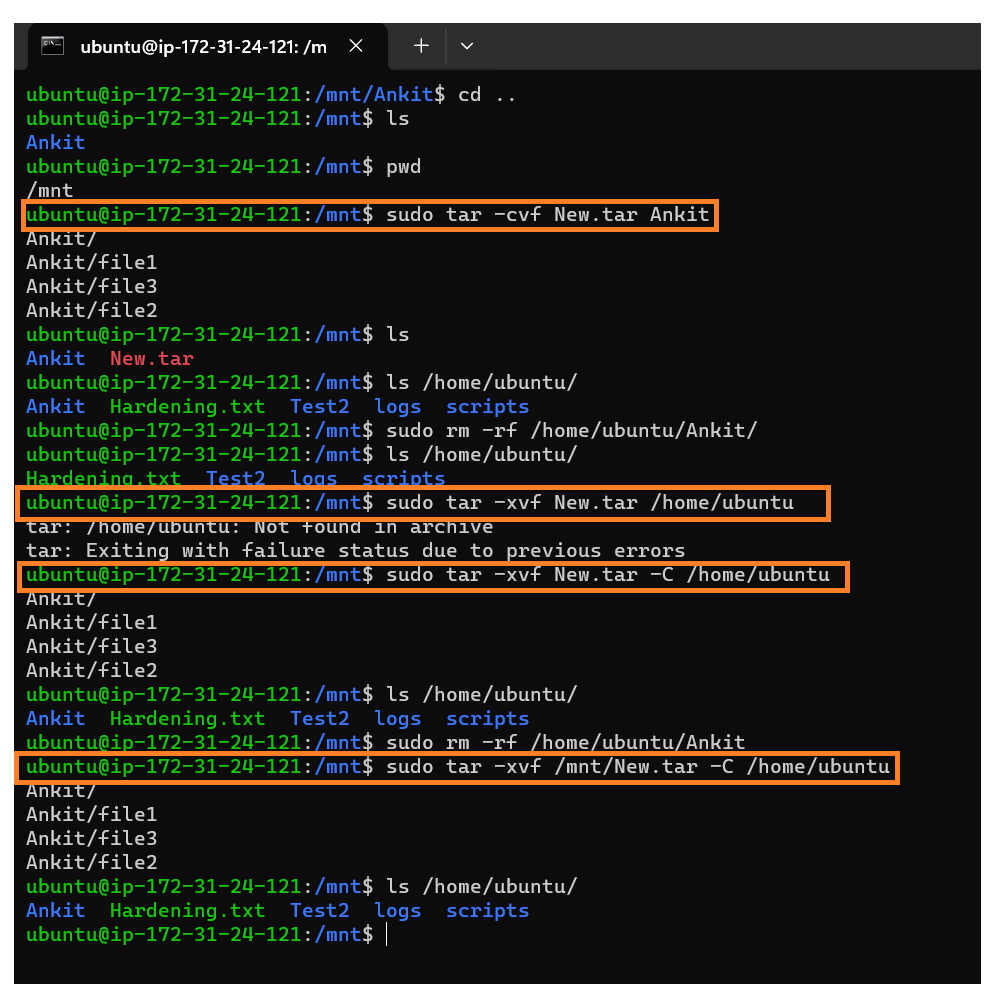
To extract a tar file on the specific Location:
#if you are in same folder where Tar File
tar -xvf New.tar -C /home/ubuntu

#if you are in different folder
tar -xvf /mnt/backuo.tar -C /home/ubuntu
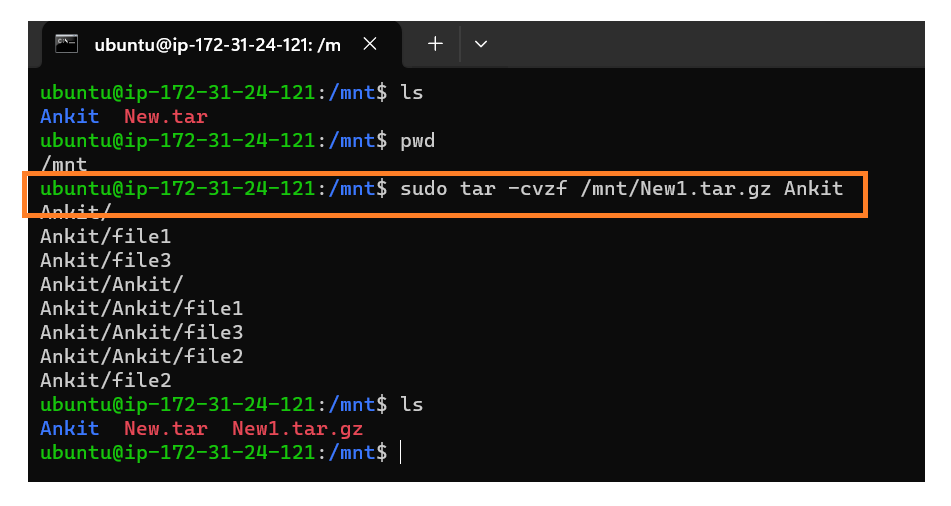
To create a tar archive file with compress in size (gzip):
sudo tar -cvzf /mnt/New1.tar.gz Ankit
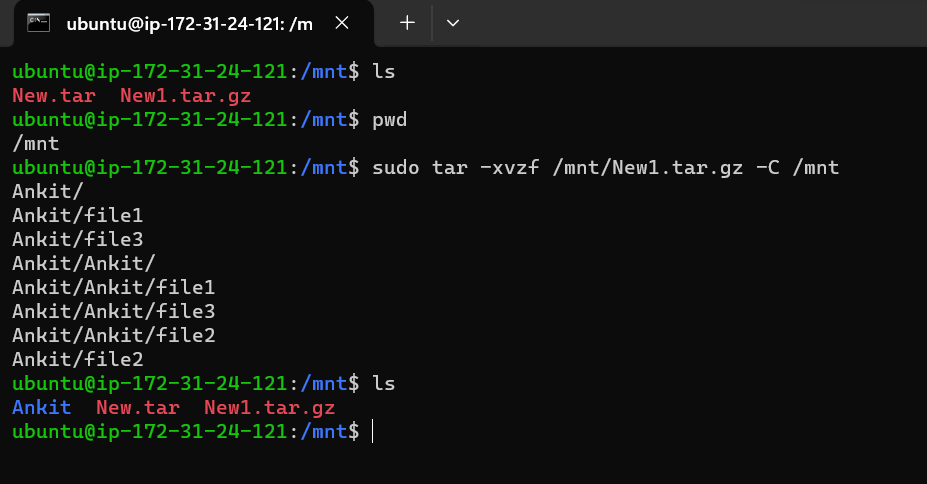
To create a tar archive file with compress in size (gzip):
sudo tar -xvzf /mnt/New1.tar.gz
sudo tar -xvzf /mnt/New1.tar.gz -C /mnt
To create a tar archive file with compress in size (bzip/bz2)
sudo apt-get update
sudo apt-get install bzip2

sudo tar -cvjf /mnt/New2.tar.bz2 Ankit
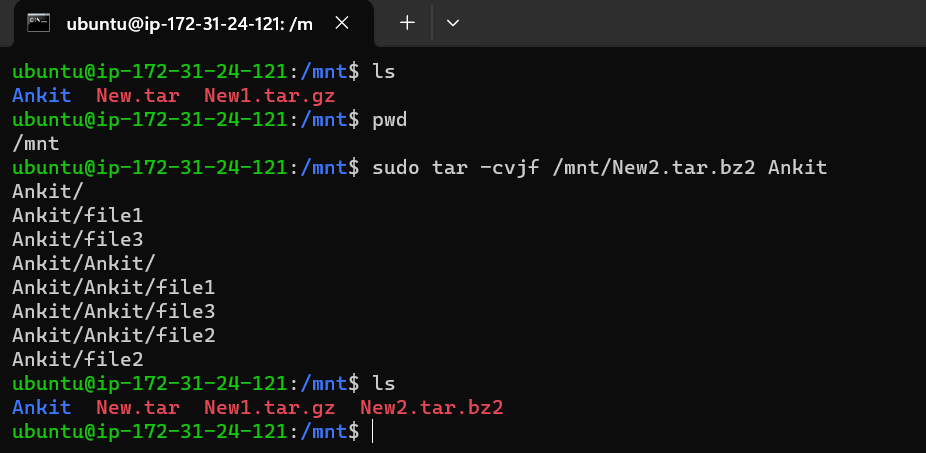
To create a tar archive file with compress in size ((bzip/bz2)
sudo tar -xvjf /mnt/New2.tar.bz2

sudo tar -xvjf /mnt/New2.tar.bz2 -C /mnt/
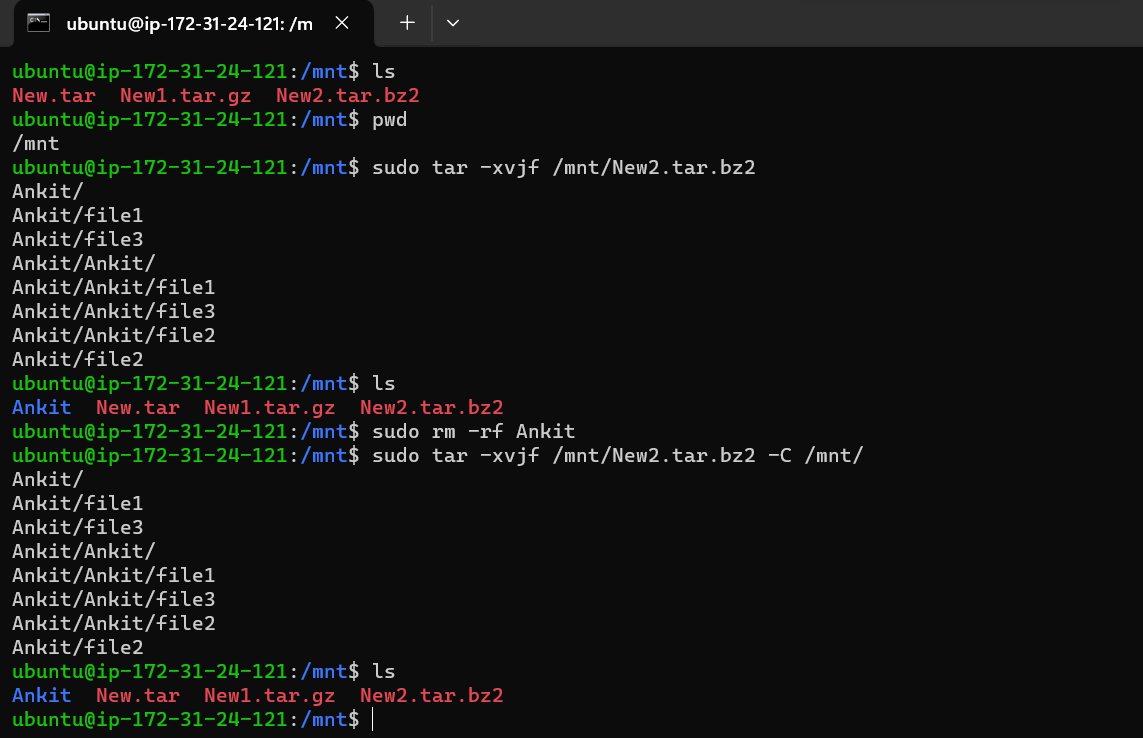
To create a tar archive file with compress in size (xz) :
sudo tar -cvjf Ankit.tar.xz Ankit
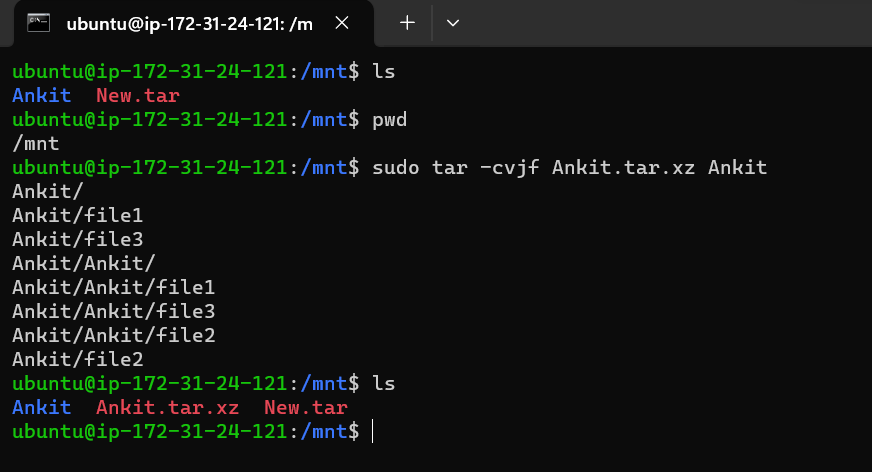
To create a tar archive file with compress in size (xz) :
sudo tar -xvjf Ankit.tar.xz
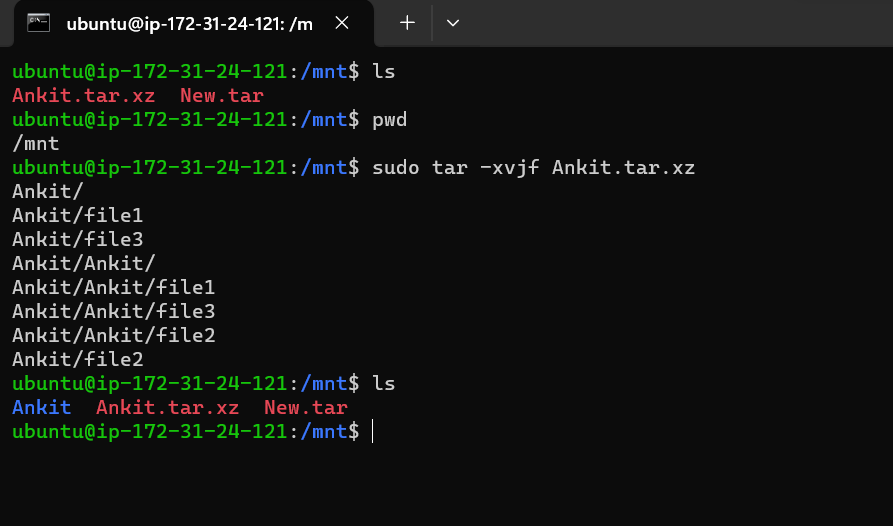
Job Automation:
Job automation in Linux refers to the practice of using tools, scripts, and processes to automate repetitive and routine tasks within a Linux environment. The goal is to streamline operations, reduce manual intervention, minimize errors, and improve overall system efficiency.
Types of Job Automation:
at -
"at" is a command-line tool for scheduling jobs to run at specific times.
It is typically used to schedule jobs that need to run once or at a specific time and date.
For example, you could use "at" to schedule a job to run every day at 5:00 PM.
To use "at", you would type the following command:
at time jobWhere "time" is the time you want the job to run, and "job" is the command you want to run.
For example, to schedule a job to run every day at 5:00 PM, you would type the following command:
at 5:00 PM every day job
crontab-
Crontab is a file that contains a list of jobs to be run at specific times.
It is typically used to schedule jobs that need to run on a regular basis, such as daily, weekly, or monthly.
To use crontab, you would type the following command:
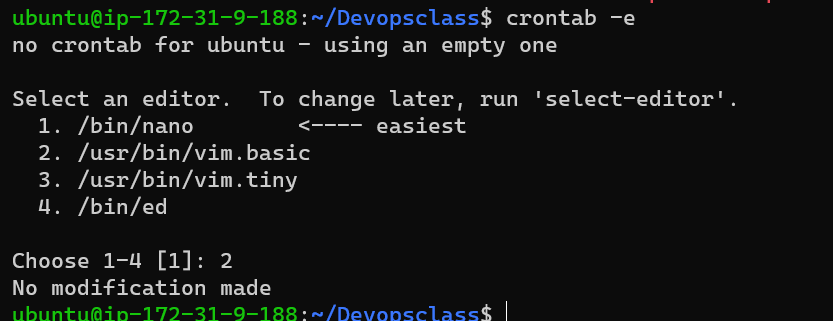
crontab -eThis will open the crontab file in a text editor.
You can then add lines to the file to schedule jobs.
Each line in the crontab file contains six fields:
  1. Minute
  2. Hour
  3. Day of month
  4. Month
  5. Day of week
  6. Command
For example, to schedule a job to run every day at 5:00 PM, you would add the following line to the crontab file:
0 17 * * * job- This line tells the cron to run the job "job" at the 0th minute of the 5th hour of every day of the month.
| Feature | At | Crontab |
| Use case | Scheduling jobs to run once or at a specific time and date | Scheduling jobs to run on a regular basis |
| Syntax | at time job | 0 5 * job |
| Flexibility | Less flexible | More flexible |
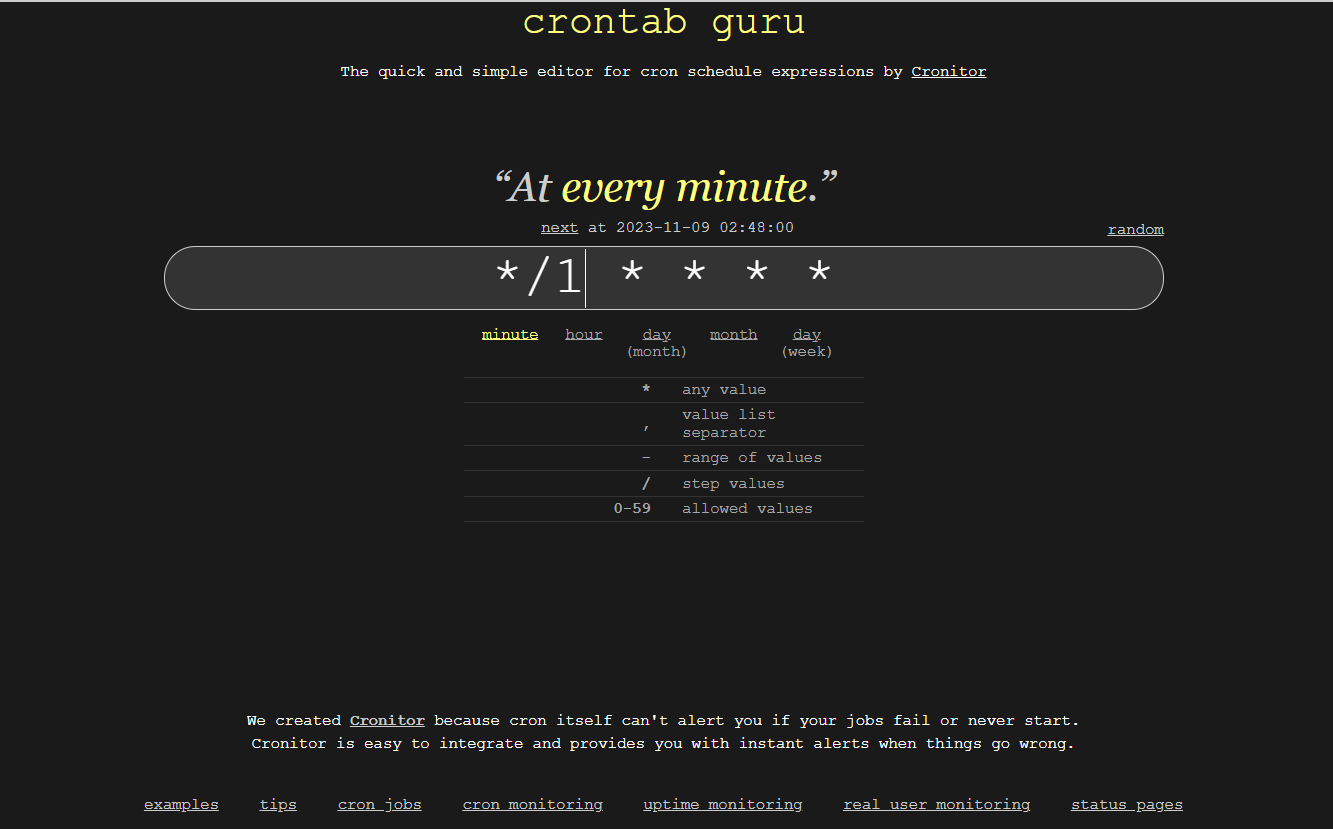
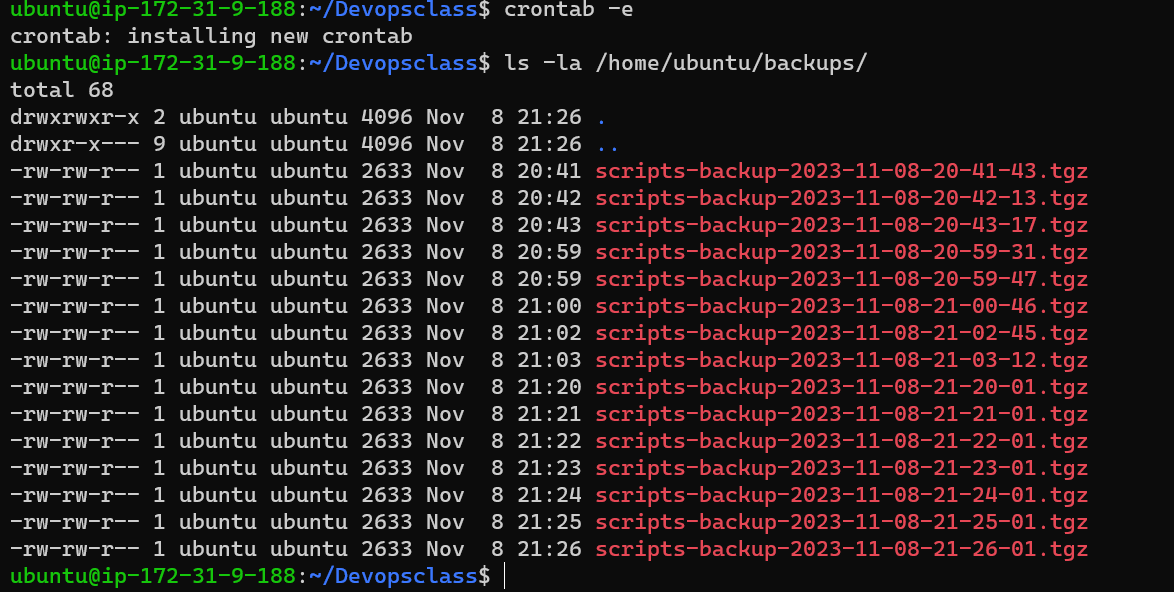
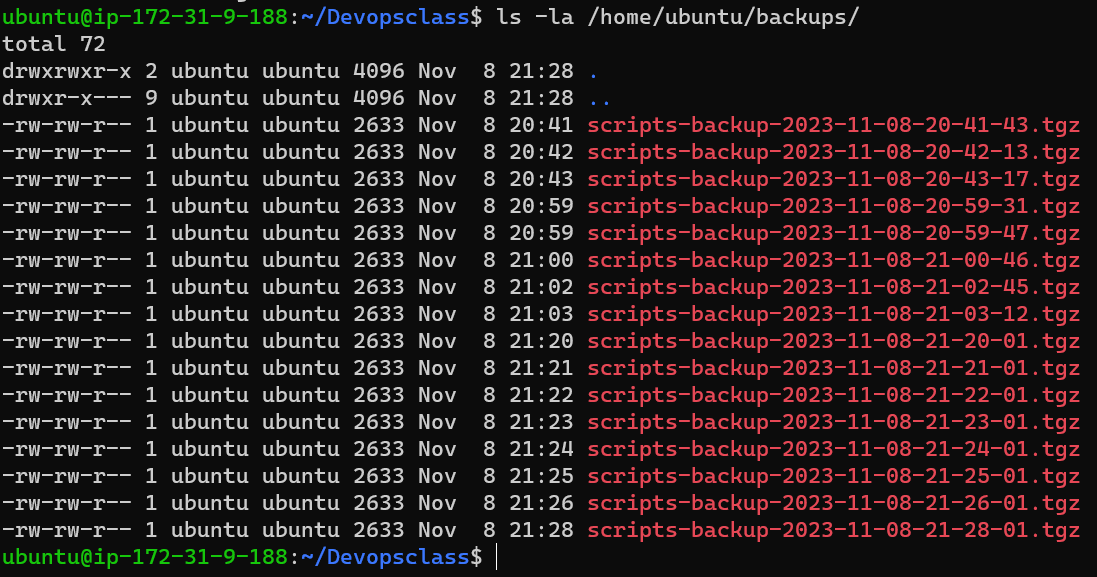
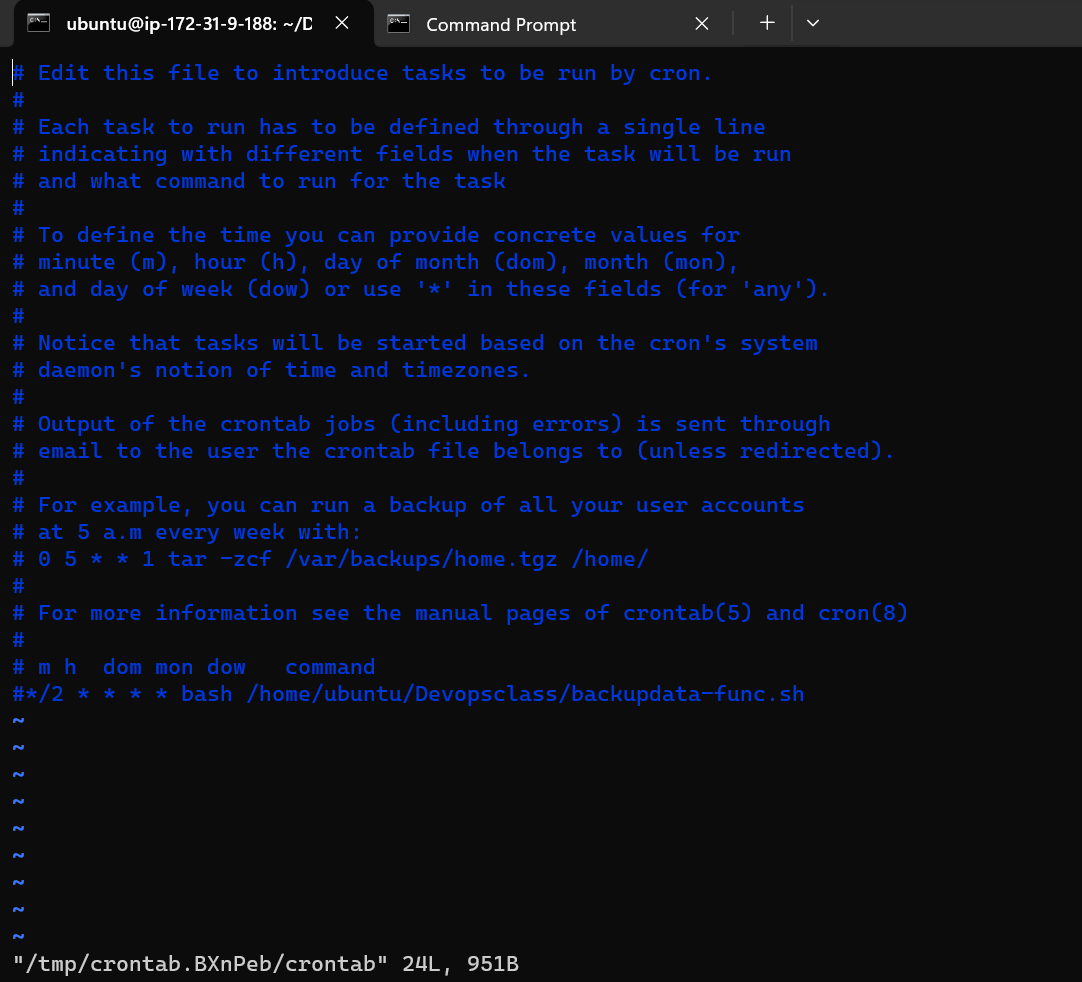
Creating a cronjob so we can automate a backup process to take backup after a certain interval time.
A crontab file is where you write the automation code.
You can visit this site for cron schedule - https://crontab.guru/
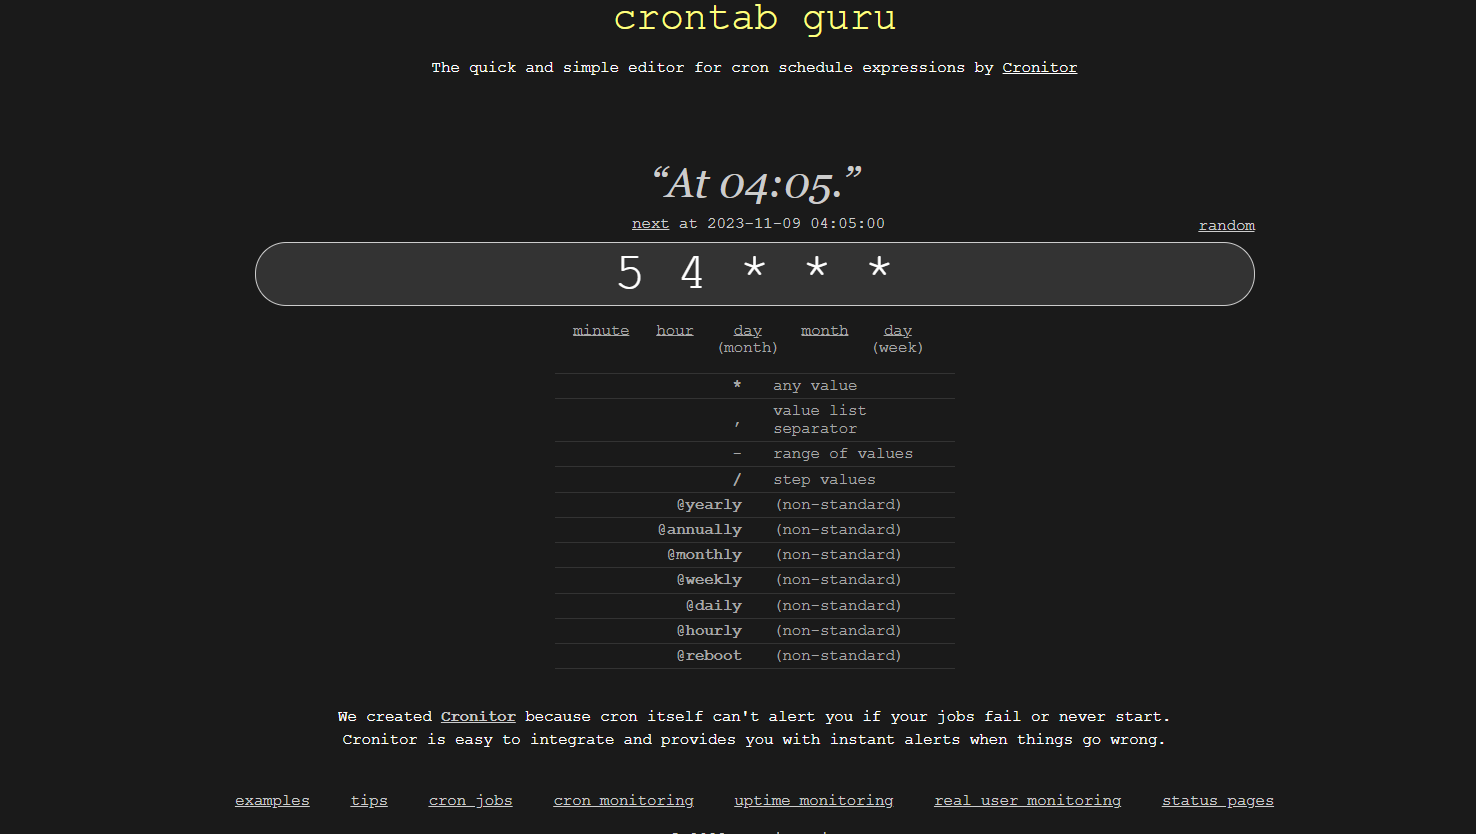
At every 1 minute
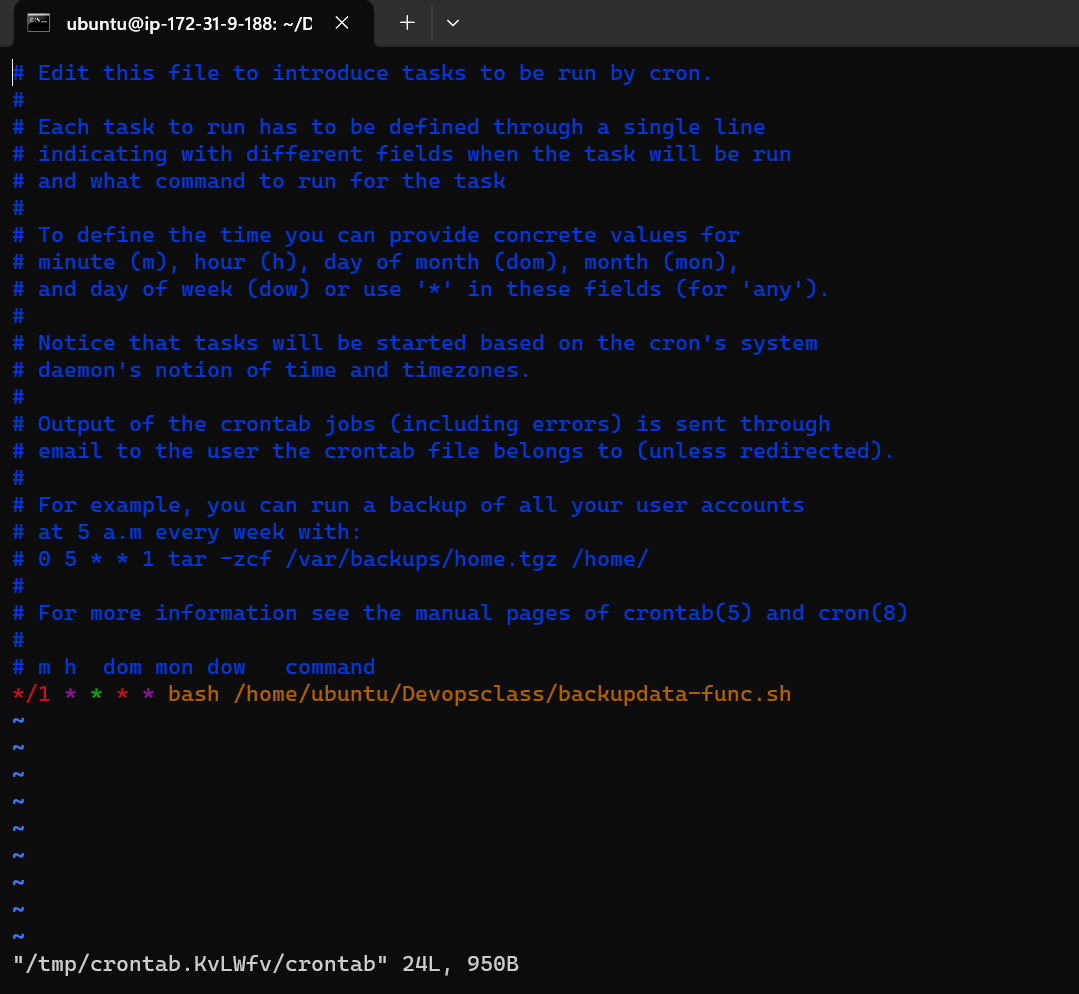
How to stop cronjob?
Ans: remove the cronjob in crontab.
To a set job with "at" command:
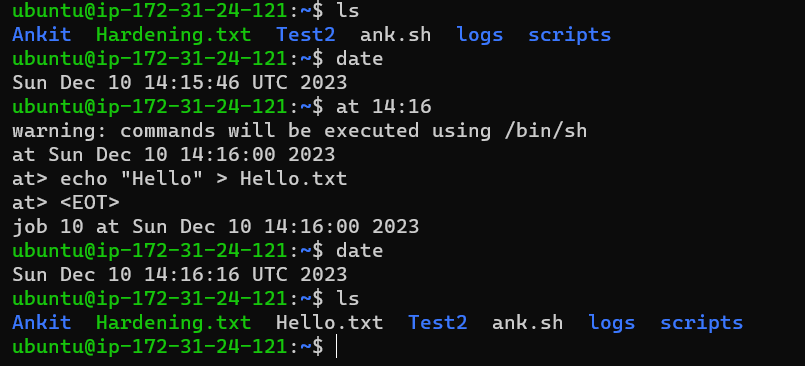
Before entering at command first, check your server date and time.
#date
at 14:16
echo "Hello" > Hello.txt
# ctrl+d (write and quit)
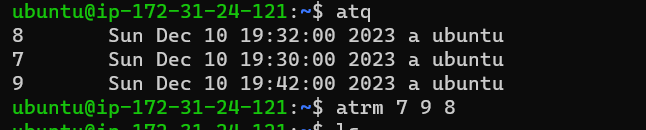
To show pending a job:
atq
if the job is executed then no output is shown.
To remove a job:
atrm 7 8 9
To restrict users from accessing "at" :
vim /etc/at.deny
Ankit  (add here user name)
:wq (write&quit)
To start crond service:
The crond service is commonly used on systems that use the SysV init system. However, on Ubuntu, the default init system is systemd, and the cron service is managed by the cron service, not crond.
To start the cron service on Ubuntu using systemd, you can use the following command:
sudo systemctl start cron
To enable crond service (Permanent on)
sudo systemctl enable cron
For set cron jobs :
crontab -e

#If you want to edit the crontab for a specific user, you can use:
crontab -u username -e
# Replace username with the actual username.

To show cron jobs of the current user
crontab -l

To remove cron jobs
crontab -r
or, go to the crontab file and remove the job lines
#crontab -e
To show the cron job, other users :
The command crontab -u shub -l is used to list the cron jobs for a specific user, in this case, the user with the username "shub". When you run this command, it will display the current user's (in this case, "shub") cron jobs.
crontab -u ubuntu -l

To restrict users from cron service:
vim /etc/cron.deny
If the /etc/cron.deny and /etc/cron.allow files don't exist, and you want to restrict access to the cron service, there's another way to achieve this on systems using the pam module.
You can use the /etc/security/access.conf file to control access to various services, including cron.
sudo nano /etc/security/access.conf
ACL(Access Control List):
The getfacl and setfacl commands in Linux are used for working with Access Control Lists (ACLs) on files and directories. ACLs provide a more fine-grained control over file permissions than traditional Unix permissions.
getfacl Command:
The getfacl command is used to display the ACLs of a file or directory.
getfacl Hello.txt
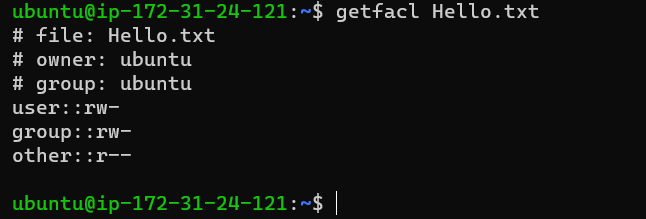
The output will show the ACL entries for the specified file or directory.
setfacl Command:
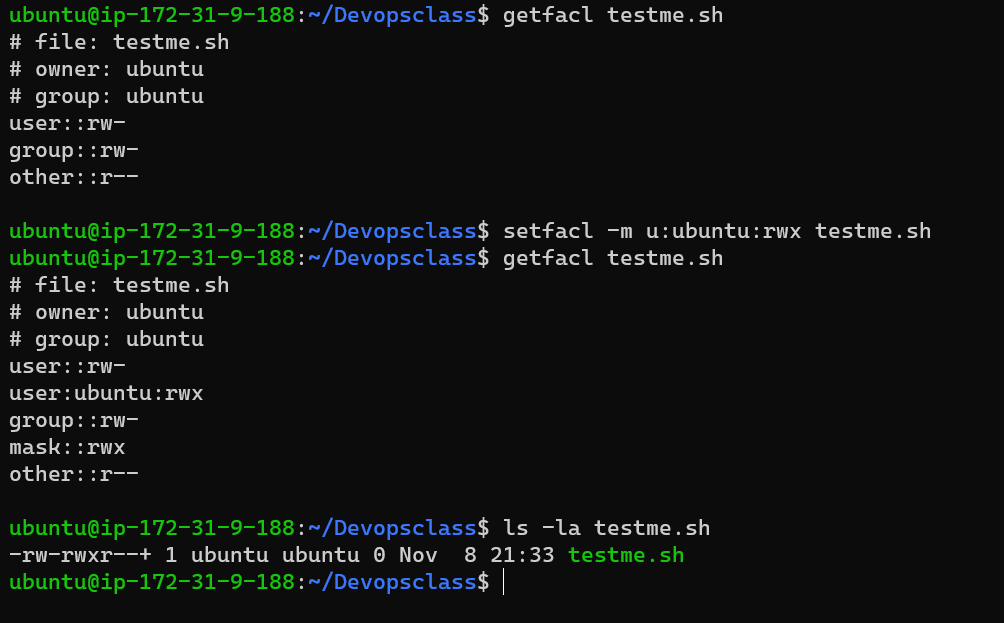
The setfacl command is used to set or modify the ACLs of a file or directory.
setfacl options acl_specification filename

setfacl -m u:username:rw- testme.sh
This command adds read and write permissions for the specified user (username) to the ACL of the testme.sh file.
Here are some common options for setfacl:
-m: Modify the ACL. You can use this option to add or modify ACL entries.-x: Remove specific ACL entries.-b: Remove all ACL entries, essentially setting the ACL to default.
**Note: Day 5 GitHub Task
Refer to Task5 : https://github.com/LondheShubham153/90DaysOfDevOps/tree/master/2023/day05
Code Solution: Still Working
🙏🙏🙏🙏🙏🙏🙏🙏🙏🙏🙏🙏🙏🙏🙏🙏🙏🙏🙏🙏🙏🙏🙏🙏
I sincerely hope this blog helps you save valuable time, allowing you to cherish moments with your loved ones. Keep smiling and spread the love!😄😄. Thank you for reading.🤝🤝
Your support means the world to me. If you’ve found this blog enjoyable and informative, Please take a moment to hit that cheerful Like button and share it with others. Thank you for being a part of this journey!🙏🙏.
..........................................................................................................................................
Follow/Connect Me: LinkedIn | Medium | GitHub|Hashnode|Linktree🔔🔔🔔🔔.
Please Support Me through “Buymeacoffee ” ☕️.
..........................................................................................................................................
Below are the Links to a series of Detailed | Step by Step of WordPress Website Hosting on AWS Lightsail :
🚀 Part 1: How to host a WordPress website on AWS LightSail.
🔍 Part 2: Find Login Credentials of the Dashboard of WordPress AWS Lighstail.
🌐 Part 3: Setting up a Lightsail Static IP Address from Dynamic IP Address.
📌 Part 3.1: Dynamic IP address of Instances in AWS Lightsail.
🌐 Part 4: How to Register a Domain Name with Amazon Web Service | Register a Domain Name using AWS Route53.
🔗 Part 4.1: Connect a Route53 Registered Domain to AWS Lightsail Instance.
🛡️ Part 5: Set up a Free SSL Certificate on WordPress AWS Lightsail.
..........................................................................................................................................
🙏 Thank you for being a part of our community!


